Monday, August 27, 2012

recovering pack rat with mild OCD


I used to be a pack rat and would save everything!  And I do mean everything.  The most meaningless things could NOT be thrown away because "someday I might need it for something".  I'm not sure when I outgrew that, but I think it was around the time I started having a "touch" of OCD.  Okay, it was more than a touch.  I got rid of all the clutter I had built up and could no longer stand to keep stuff for no reason.  I also needed everything in its "proper place".  I had my closet color coded according to ROY G BIV and all my hangers had to be the exact same distance apart.  If I removed an item of clothing, I had to redo my entire closet so that all the remaining clothes were spaced "correctly".  I would erase and rewrite my math homework 20 times until my 8's looked perfect.  I still hate my 8's - they are so ugly.  I remember the moment when I realized I was no longer going to be able to keep up with these habits.  I was sitting in my college dorm room, erasing my engineering homework for the umpteenth time and it hit me that I was sitting in my room getting my homework to look "perfect" for a professor who never saw the homework, a TA who couldn't care less, and all the while I was missing out on the fun going on around me. I still have my closet color coded and my cupboards organized, and occasionally I alphabetize things if I think it is really worth it.  But now I find myself thinking, "will this save me time in the future, or am I just OCDing".  If the answer is that it isn't a time saving measure, than I don't do it.   

So what does this have to do with quilting?  After I finished Ava's quilt back, I still had a handful of leftover squares.  I could have stashed them as many quilters do, and in fact when I first decided to start sewing on a regular basis, I would buy fabric for no reason - just so I could stash it and "have it someday in case I needed it for something".  But not too long ago I realized I was already running out of room in my small sewing space.  Not to mention I really couldn’t see what I had.  Plus, I decided it would be nice to just go to the quilt shop and pick out fabric for a project, right when I wanted to work on the project, rather than having to use fabric I had seen for months.  So I made up my mind that I am not buying any more fabric to stash.  Rather I will go purchase fabric when I want to make something.  I think that will keep sewing / quilting fun and exciting.  Plus I think it will be a great incentive to finish a project – knowing that then I get to go buy new fabric!  I love fabric – not sure if you can tell. 

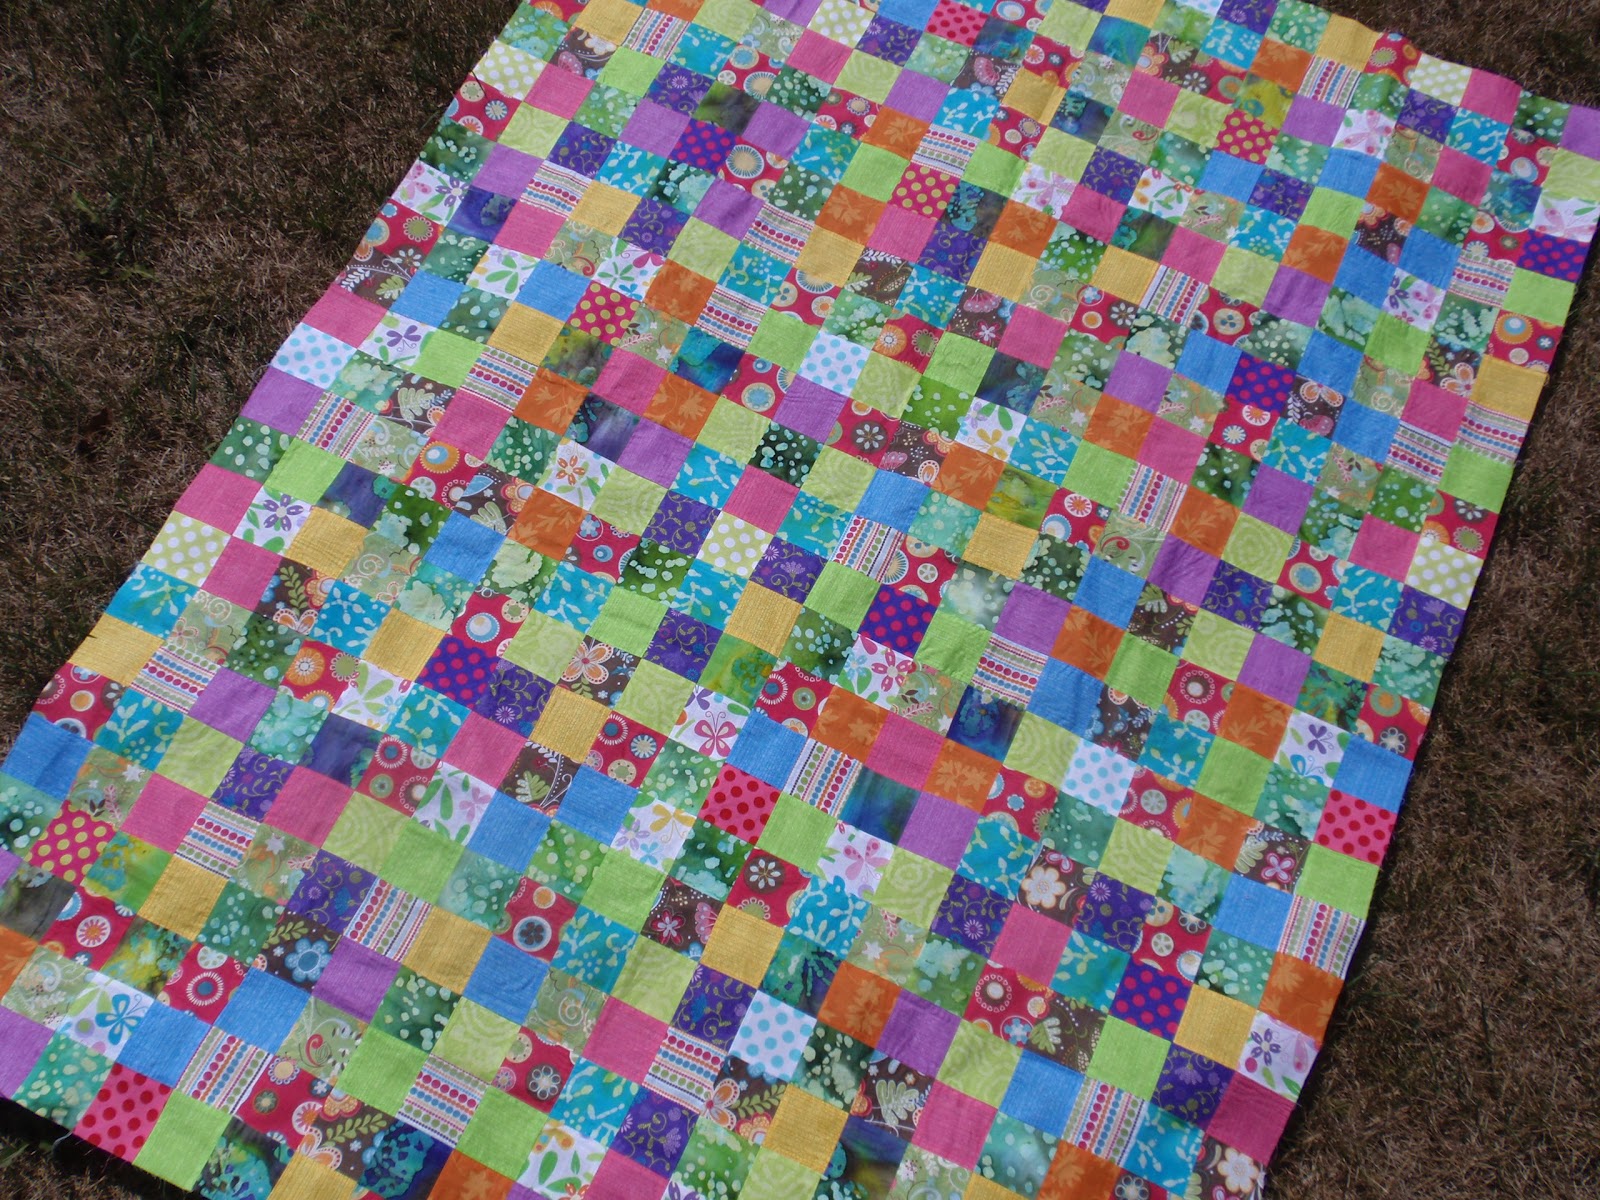
So this leads me to the leftover fabric I had from Ava’s quilt.  I talked about it in my last post.  I decided that it would work for a nice doll quilt for my daughter, so I jumped right on it during the next nap time and this is what I churned out:

Super scrappy doll quilt top.  Nothing orderly about this. Must not let OCD take over....

After she went to bed that night, I threw together the backing (also out of scraps), layered it up, basted it, and got all excited to quilt it that night.  I decided since it was a doll quilt, it would be a perfect size to try free motion quilting on my machine.  I put the free motion (darning, open toe, hopping - whatever you want to call it) foot on my machine and started practicing on a scrap.  No good my friends, no good.  My bobbin thread tension was way off.  Railroad tracks all over the place.  I took the free motion foot off and put the 1/4” foot back on and sewed on the scrap again – perfect stitches.  Put the free motion foot back on and back to pure crap.  So I’m not sure what I need to do to fix it.  I guess I’ll be putting in a call to Brother this afternoon and hopefully they can help.  I had high hopes of finishing that doll quilt all in one day, all with scraps! 

And by the way, after piecing Ava's quilt and quilt back, AND the top of the doll quilt, this is what I had leftover for "scraps".  The largest piece I will keep for checking thread tension, the rest are going into the trash. :-)
My pressing table aka my night stand.

I could keep talking about how quilting has helped my OCD, but this post is already getting pretty long, so I will save it for another day. 

Thanks for reading!
-V

Friday, August 24, 2012

a finished quilt back, fabric feature, & why I need a sewing space slash design wall

How's that for a post title?

I finished the quilt back for Ava's quilt late last night.  It surprisingly took me longer than I thought it would. I don't know why that is surprising.  I should realize by now that everything takes me longer than I think it should.  Here's a picture:


You didn't think I was going to show you the whole thing, did you?  That would ruin the surprise of the finished quilt.  That would require me to iron the backing, only to fold it back up again until it is ready to go to the quilt shop for quilting.  More about the quilt back in a future post when the quilt is finished!

Next up.... a fabric feature!  Awhile back, I had decided I was going to do this "segment" on my blog where I would show fabrics in my stash.  My original plan was to do it the first Friday of every month and call it something gawd-awfully cheesy like "First Friday Fabric Feature".  But since I finished the backing for Ava's quilt last night, I am ready to move on to Ella's quilt that will be her Christmas present, and so I wanted to show the fabrics before I dig in with the sewing.

Little Apples, A Walk in the Woods, & Sherbet Pips all by Aneela Hoey

I bought this fabric many months ago - like maybe last November or December.  I had seen this quilt made by Rita with the same fabrics and thought it would be so cute for Ella.  Rita's quilts are so amazing & inspiring.  Her postage stamp quilt inspired the quilt I made for Ava.  I seriously love her work so much!

Anyway, I purchased 3 charm packs, which are 42 squares, one of each fabric in the line, and they are 5" square.  I had originally thought I would do a tumbler pattern like Rita's quilt, but after seeing the charm squares I just can't bring myself to cut anything off of them.  I'm already sad I have to lose 1/4" on each side for the seam allowances!  I wish I would have purchased yardage of these lines, but the charm squares will be nice to work with as my sewing space is very, very limited.  The charms are "Little Apples", "A Walk in the Woods", and "Sherbet Pips" all by Aneela Hoey.  They are 3 different fabric lines, so the colors are not identical between the lines, but it doesn't really bother me oddly enough.

I am also going to use some additional fabrics in order to make the quilt larger and also just to incorporate some other fabric that I like and think will complement well.  I think some of these fabrics were in Rita's quilt as well.  


The fabrics above are all Michael Miller fabrics - the same brand as the horse fabric I just used.  I am really looking forward to using this fabric because it is soooo nice to work with!  The polka dots are called Ta-Dot.  I purchased an entire fat quarter bundle of the line because I love them so much and they will work great in lots of quilts.  The other 4 fabrics are from the "Children at Play" line and from left to right are "Pinwheels", "Mini Mikes", "Summer Gardens", and "Dolls".


I think the fabrics go together pretty well considering they are really from 5 different fabric lines.... I'm a little iffy on the red - but hopefully in the quilt it will look like it is supposed to be there.

And lastly, why I need a sewing space and preferably one with a design wall:

Yep, that's my kitchen counter

Laying out leftover scraps from Ava's quilt to see what I had left and what I could do with it.  I think maybe a doll quilt for my daughter since she is constantly getting dish towels out of the drawer to use as blankets for her dolls.

And this is currently laying on my bed

Surveying leftovers from Ava's bulletin board project... Not sure what to do with this yet... maybe a pillowcase?

Thanks for reading!
-V

Wednesday, August 22, 2012

tote bag

I had a few pieces of fabric leftover from making Ella's pillowcase dress and Ava's iPod pouch, so I thought I would put them to good use. When I gave the iPod pouch to Ava, Ella was using it to "store" her babies' bottles. You know, those tiny little bottles that come with baby dolls and when you tip them upside down, the liquid inside "magically" disappears. So I thought I would throw together this little tote bag for Ella and she could use it however she wants, although I have a feeling it might become a "diaper bag" for her little babies.

I followed this tutorial. It came together super quick and easily. The lining is the same fabric as the outside of the bag, since I had enough of it leftover to use it for both. The fabric for the strap was leftover from the lining of the iPod pouch.


The bag measures 11.5" wide and 10" tall. The bottom corners are boxed. The strap measures 6" from the top of the bag to the top of the strap, if that makes sense. So it should be okay for Ella to throw over her shoulder.


I loved working with this Michael Miller fabric! It has a very nice weight to it and did not distort when pressing.

I could definitely see myself making this tote in a larger size. It seems so versatile and it was so easy to make!

Now I must must MUST force myself to finish the backing for Ava's quilt! I just want to get it done so I can move on to the next project!

Thanks for reading!
-V

Friday, August 17, 2012

pillowcase dress for Ella

I finally finished Ella's pillowcase dress late last night. My daughter was sick last Friday through Monday - running a 102.5 temp all weekend. She didn't sleep well at night or nap well and wanted to snuggle most of the time. Not that I am complaining. She never wants to cuddle anymore, so I'll take what I can get.

I finally got a chance to try out my side cutter, which functions similar to a serger, but is just a foot for my machine. I got it to work right away, which was surprising because I had tried to use it once before and could not get it figured out. Must have been one of those things you have to walk away from for awhile, because it made perfect sense & worked immediately this time. I was so excited that it was working, that I got a little carried away trying out different stitches on it and forget to check that the needle wouldn't hit the foot before changing to one of the stitches. My first time breaking a needle. I still have no idea where the rest of the needle is... I think in my machine, although maybe I will step on it someday & "find" it. That sounds about how my luck goes...


I needed to change the needle anyway, so no big deal.


I didn't take any pictures of the process because I worked at night and it was too dark to get any good pictures. But here is the final result:


I read a couple of tutorials - this one, this one, this one, and this one, as well as looked at a pillowcase dress I had ordered from Etsy for my daughter around Easter time. I would do lots of things different next time, but I still think the dress looks pretty good for being my first garment. I only used my side cutter on the horse fabric, but it turned out really well and looks like it will hold up well, so I think in the future I would do that on all the fabric. I did a double binding around the armholes, which is maybe too thick of a binding, so I would probably do a single binding next time. Also, the tie is a little wider than I would have preferred, and I cut that at 2 1/4", so I would try 2" or even 1 3/4" next time. All in all, a pretty quick and fun little project. And I have enough fabric left to make a little matching tote bag, so hopefully I can get that turned out before Ella's birthday - only 9 days away!

Thanks for reading!
-V

Wednesday, August 8, 2012

iPhone / iPod pouch


I went to the quilt shop the other day (to look for backing fabric for Ava's quilt) and yet again found some fabric that just begged to be purchased. This Michael Miller fabric is perfect for my nieces since they love all things horses, not to mention purple is Ella's favorite color. (It's a very good thing my daughter isn't old enough to ask me to make her things yet!)  My sister right away said it would make a great pillowcase dress for Ella, so that is my next project. And of course, Ava wanted an iPod pouch made with this material. I figured the iPod pouch would be a fairly quick project, plus I wanted to cut the fabric for that prior to washing it for the pillowcase dress. I followed this tutorial for the iPod pouch.


I cut the fabrics and sewed it up per the tutorial instructions. The instructions say to leave the opening at the top of the flap. I'll be honest - I have no idea how anyone gets that to work and look nice. Mine looks very wonky (at best). And please look at all the pins I had to use just to try to keep the pieces flipped under. Big mistake. Huge.

If When I make this pouch again I plan on leaving my opening at the bottom. I can't see why it would be a problem to do so. The flap on the top should (theoretically) be easier to turn out than the 2 corners and then the only topstitching would be across the straight bottom seam. Of course, there is probably some reason not to do that, which I will learn about when I am trying to do it, but that is part of the fun, right? Not at the time anyway, but afterwards it's always fun to look back at your silly mistakes. Case in point....


I got it topstitched shut, but pretty it is not. Fortunately I don't think my niece will care or notice. Also, my velcro *might* be a touch wonky. It's difficult to tell since the flap is so distorted. The tutorial said to place the velcro on the flap 3/4" down from the top of the flap. I find this to be just a touch too far down. My velcro doesn't line up perfectly when the flap is shut. On the next pouch I make, I will move that velcro up just a bit. 


Below is a picture of the pouch with my iPhone inside. The iPhone fits very nicely. Not too snug so it is difficult to get out, but not too loose either. I also have an iPod touch and that fits very nicely as well.


And lastly is a picture of the closed pouch. Other than my disappointing flap, I think it is pretty cute and very functional.


Thanks for reading and stay tuned for Ella's pillowcase dress! It will be my first garment so we'll see how it goes!

-V

Sunday, August 5, 2012

doll quilt for Ella's babies

My niece Ella has her birthday at the end of this month. Ella is Ava's younger sister & will be turning 4. Don't you just love their names - Ava & Ella? They are my only (& thus favorite) nieces. I love them both to pieces. But it is funny just how different they are. Not only in appearances, but in personality as well. Ava is spunky and high energy (read: hyper) and sometimes has her head in the clouds; which I love about her! Ella is also fun & can get a little rambunctious from time to time, but typically she is a little more laid back and sweet. Ella is a bit more sensitive than Ava perhaps. Or maybe Ava just masks her vulnerabilities better now that she is 7. But I digress...

So I decided I should start to think about what I was going to make Ella for her birthday, since it is only about 20 days away! Somehow projects always seem to take me longer than I think they are going to. My mom and I were discussing what to get sweet little Ella and she suggested a doll quilt for Ella's "babies" since Ella is at the stage where she thinks her baby is her child. She said to me the other day, while pointing to her plastic baby, "that's my kid". Which if you have ever heard her voice, you would be cracking up. She has a pretty deep voice for a little girl and it came out kind of gravely sounding. So it sounded like a 55 year old chain smoking woman saying it, but of course, the comment came out of the mouth of a (nearly) 4 year old. Again I digress....

I'm on this kick lately where I feel I should use what I have in my fabric stash rather than buying new fabric. Mostly because I realized I am already running out of room to store all of this fabric and deep down I am just not a "hoarder". So I browsed through my stash and came across a package of mini charms from Bonnie & Camille's new line Marmalade.


First of all, have you seen these mini charms? They are adorbs! I was in the quilt shop a few weeks back and the Moda rep was there as well. She gave my daughter the mini charm pack to play with as I was shopping. It was a super sweet gesture. I wish I had a picture of the mini charm pack before the little twerp got it opened and started laying out the individual squares of fabric. The mini charm packs are so cute - 2.5" squares, 42 in a pack, one of each fabric in the line, with some duplicates. I know the quilt shop ordered some for this fall, along with a book with project ideas for use with the mini charm packs. Must Not Purchase More Fabric.... EEEK! It's going to be difficult when I go in there & see those cute little mini charms.

Secondly, have you seen the Marmalade line? Have you seen it in person? My local quilt shop has the Vintage Modern line (which I also love and of which I have a fat quarter bundle), but didn't order the Marmalade line. Probably a good thing - at least for my pocketbook. I seriously should find someone who can take good pictures for me, as I know I am not doing this fabric justice. The colors are "juicy" - if that means anything to you.

After I rounded up all the little squares, and organized them by color (see previous picture), I started laying them out as randomly as my brain will allow. The picture below is what I came up with, after redoing the layout a couple times. I decided to stick with a simple patchwork design since it is just going to be a doll quilt.


Then I sewed the squares into strips.


Then I pressed the seams in oppposite directions for each row and then sewed the rows together to make one big "block", 7 squares x 6 squares. 


Then I layered up the backing, batting, and quilt top and quilted using ivory thread 1/4" away from each seam.


Close up of the quilting. Not that you can really see much with my horrible photography skills skillz.


Check out the cute backing fabric. I used one of my fat quarters from the Vintage Modern line (also by Bonnie & Camille for Moda). (Ignore my chubby fingers.)


For the binding, I cut 2 1/4" strips from my leftover backing, sewed the strips together at a diagonal, and pressed in half lengthwise. From there I machine stitched the binding to the back of the quilt, with raw edges together. Then I folded the binding over to the front and machine stitched the binding to the front of the quilt, mitering the corners. Sorry I don't have any pictures of that, but I figure if you are still reading this far, you maybe know what I am talking about. Although I should try to get some close up pictures of the stitching on the front of the binding. I got really close to the edge this time and I think it looks rrrrrreallly great.


Since I used leftover backing for my binding and because the backing fabric is directional, you'll notice that the direction of the "pez" like shapes changes a couple times around the quilt. I was hoping it would line up so it was going one direction along the long side of the quilt and the other direction on the short side of the quilt, but it didn't quite work that way. I'm okay with it since it is just a doll quilt. And it was good practice for if I ever use a patterned fabric for a binding in the future. Which I think is a very real possibility as I love love love the way it turned out - even with the messed up direction.


Hopefully Ella likes it for keeping her babies warm. But if not, it might even work for a table topper (or an extra large mug rug).

Thanks for reading.
-V

a finished quilt top!

My goal was to finish Ava's Christmas quilt top by the end of the week & I DID IT!!!! My daughter has suddenly decided to become a good nap-taker. I can not complain. So between a couple of her long naps and working a couple late nights after she had gone to bed, I finished the quilt top. I am thrilled with it. The colors are really vibrant and I think hope Ava likes it!

I am having a difficult time deciding which pictures show off the quilt top best (& I take really crummy pictures - even with my nice point & shoot), so prepare your eyes for a barrage of bright images.


Now I just have to start working on the backing! Have a great Sunday!

-V